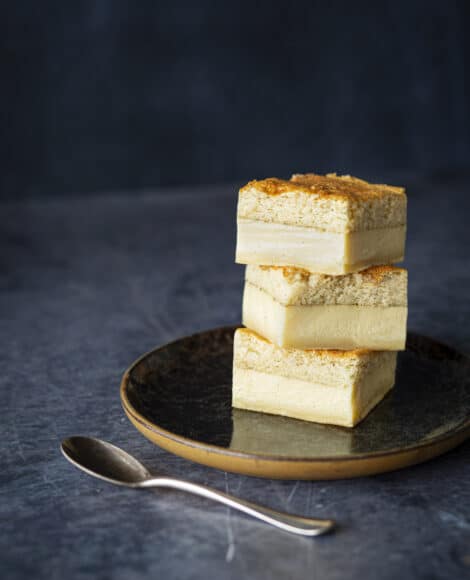
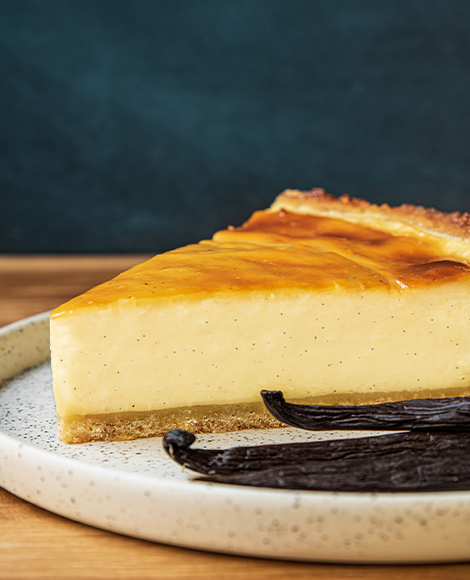
100% Vanilla Tartelet

-
EQUIPMENT
1 whisk
1 spatula
1 pastry spatula
1 mixing bowl
1 paring knife
1 rolling pin
1 immersion blender
1 saucepan
1 mixer or food processor
1 pastry brush
1 set of scales
1 probe thermometer
1 Silikomart 3cm half-sphere mold
1 Silikomart Globe mold
6 round 8cm tartlet rings
1 Silikomart Mini Dots mold
Piping bags
Parchment paper
-
Optionnal
2 × 2mm thick rulers
1 grater (Microplane®) or sieve
1 set of smooth round cutters
1 micro-perforated tray
1 micro-perforated mat
1 × 2-3cm tube
1 sheet of guitar paper
1 laser thermometer
-
SMOOTH CARAMEL
- Sugar 50g
- Glucose syrup(1) 55g
- Heavy cream 36% 105g
- Whole milk 30g
- Glucose syrup (2) 25g
- NOROHY vanilla bean 1
- Fleur de sel (a pinch) 0,6g
- Cold cubed butter 40g
Heat the cream, milk, scraped vanilla and glucose syrup (2).
As soon as it starts boiling, stop cooking and leave it to infuse for 15 minutes with the pan lid on. Heat the sugar and corn syrup (1) in a saucepan large enough to allow the liquids to be added later.
Cook until your caramel is golden in color and fluid (it should be 365°F or 185°C if you have a thermometer).
Remove the vanilla beans from the cream, making sure to keep as much of the preparation and seeds as possible. As soon as the mixture has reached 365°F (185°C), take it off the heat and deglaze the caramel by gradually drizzling in the hot liquids while stirring with a whisk.
Once it has boiled through thoroughly, cook it at 230°F (110°C). The caramel will dissolve again. Pour it out into a bowl and leave it to cool to 175°F (80°C). Add the butter and fleur de sel.
Emulsify the mixture using an immersion blender until it is homogenous. Place the smooth caramel in the 3cm half-sphere molds and freeze them. Leave the remainder in the refrigerator until you are ready to assemble.
IMPORTANT: The freezer should be at maximum capacity, and neither too full nor iced over. Only then will the caramel freeze successfully.
-
VANILLA-FLAVORED SWEET PASTRY
- Butter (room temperature) 60g
- Confectioner’s sugar 40g
- Almond flour 12g
- Salt 0,5g
- Egg (room temperature) 25g
- All-purpose white flour 115g
- Vanilla powder (optional) . 1g
Cream the butter and confectioner’s sugar using the paddle attachment of a food processor.Pour in the almond flour, salt and, finally, the egg while continuing to mix at medium speed. At this stage, the mixture will still be separated. Add the flour in one go.Mix until all the ingredients are fully combined together.Place the dough on the work surface and rub it together with your hands until the dough is homogeneous.As soon as it is homogeneous, stop working it to avoid activating the gluten. This way, it will retain its qualities and crumbly texture.Spread out the dough to a depth of 2mm between two sheets of parchment paper. For perfect results, use two 2mm thick rulers (you will find these in hardware stores).Leave it to set in the refrigerator.Lightly grease the tartlet rings. A thin layer is enough – you do not want any pieces of butter stuck to the ring.Cut out eight tart crusts to the same size as the tartlet rings.Using a ruler and a sharp knife, make some strips of pastry which are a little wider than the rings’ depth.Place each of the bases on the baking mat (which should be perforated if possible), and place the mat on an (also ideally perforated) baking sheet.Place a tart ring on each base. Add a strip to each of the pastry bases. Trim the excess dough from the rings.Freeze the raw tart crusts for 10 minutes to ensure that they do not move during baking. Once this is done, preheat the oven to 300°F (150°C).The tart crusts will go on the middle shelf. Bake the tart crusts for 20 minutes.Chef’s tip: If the crusts’ edges aren’t quite right after you have blind-baked them, gently grate them with a Micro-plane® or a sieve. -
GLAZE
- Egg yolk 20g
- Heavy cream 36% 5g
As well as creating an attractive finish, the glaze seals the dough from the moisture in the different fillings.
Mix the yolks and cream.
Use the brush to apply a thin layer of this mixture on the pre-baked, cooled and turned-out tart crusts.
Bake the glazed tart crusts again for 10 minutes at 300°F (150°C).
-
VANILLA SPONGE
- Butter 15g
- Sugar 65g
- Egg 25g
- All-purpose flour 50g
- Baking powder 1g
- Salt 1g
- Heavy cream 36% 45g
- Extrait de vanille NOROHY 3g
Preheat the oven to 320°F (160°C). Using a whisk, mix the eggs and sugar until blanched.
Sift the flour, salt and baking powder together and add them in.
Add the heavy cream and vanilla extract.
Finish off with the warm melted butter.
Pour the batter out onto a baking mat or baking sheet lined with parchment paper and spread it to a depth of approx. 8mm.
Bake for approx. 20 minutes.
To check the sponge is cooked, pierce it with a knife.
If the knife is clean when you pull it out, that means it is cooked.
Remove the sponge from the tray immediately to stop it cooking. Once the sponge has reached room temperature, cut it into 7cm circles.
If the sponge has risen too much during baking, cut it to a depth of 1cm.
-
VANILLA CRÉMEUX
- Milk 100g
- Full-fat cream 100g
- NOROHY vanilla bean 1g
- Egg yolks 30g
- Sugar 20g
- Gelatin 3g
- VALRHONA Ivoire white chocolate 85g
- Vegetable charcoal (optional) 0,2g
Soak the gelatin in cold water. Heat the milk, cream and scraped vanilla.
Leave it to infuse for 15 minutes, taking care to lid the pan.
Remove the vanilla bean.
Mix the egg yolk and sugar.
Pour the liquids into the yolk and sugar mixture, whisking continuously so as not to cook the yolks.
Slowly cook all the ingredients over a low heat like you would a custard so it reaches 185°F (85°C) and coats the back of a spoon.
Pour onto the white chocolate and blend.
Add the drained gelatin (and charcoal, which is used here only as a coloring agent).
Mix using an immersion blender. Place it in a container and cover it with film.
Leave it in the refrigerator until it has set completely.
-
VANILLA WHIPPED GANACHE
- Full-fat cream(1) 50g
- NOROHY vanilla bean 1/2
- Gelatin 1g
- VALRHONA Ivoire white chocolate 30g
- Full-fat cream(2) 125g
Heat the cream (1) and the scraped vanilla bean.
Stop cooking just before it reaches boiling point.
Leave it to infuse for 15 minutes, taking care to lid the pan.
Remove the vanilla bean, taking care to keep as much of the liquid as you can in the saucepan.
Heat the cream again while it is still steaming plentifully.
Pour the hot cream into the white chocolate and combine the two.
Add the drained gelatin.
Mix using an immersion blender.
Drizzle in the cold cream (2), blending all the while.
Seal the surface with plastic wrap and keep in a cool place until it has set completely (you will need to leave it overnight as a minimum).
-
VANILLA NECTAR
- Water 40g
- Glucose syrup 40g
- Panela 10g
- Brown sugar 10g
- Pectin NH glaze or 325NH95 pectin 3g
- NOROHY vanilla bean ½
Heat the water, scraped vanilla and glucose syrup.
Once the mixture has reached 120°F (50°C) (it should be steaming), sift on the sugars and pectin mixed together.
Mix using a whisk.
Bring to a boil and stop cooking immediately.
Set it aside in the refrigerator until you are ready to use it.
-
VANILLA MIRROR GLAZE
- Sugar 100g
- Glucose syrup 100g
- Water 50g
- 30% fat cream 65g
- VALRHONA Ivoire white chocolate 100g
- Gelatin 6g
- NOROHY vanilla bean 1/2
Soak the gelatin in cold water.
Bring the water, sugar, and glucose to a boil in a saucepan.
Pour the cream, white chocolate and drained gelatin into a measuring cup.
Pour in the syrup.
Blend it using an immersion blender, taking care not to incorporate any air bubbles.
Store the glaze in the refrigerator, covered with film, until you are ready to use it.
-
TEMPERED WHITE CHOCOLATE
- VALRHONA Ivoire white chocolate 200g
- Ground used vanilla bean 10g
Temper the white chocolate using the seeding method.
Sprinkle a light covering of vanilla powder onto a sheet of guitar paper.
Pour on the tempered chocolate and-spread it out to create a thin, homogeneous layer.
Apply another sprinkling of vanilla powder. Leave to set.
When the chocolate is soft but no longer sticks to your fingers, cut it into long strips with a width of approx. 2cm.
Place another sheet of guitar paper on top of the chocolate. Roll the strips of chocolate around a 2 or 3cm tube and leave them to set in a cool, dry place.
-
ASSEMBLING THE DOME
Beat the vanilla crémeux to make it a little less stiff. Fill the globe molds three-quarters full of vanilla crémeux. Knock the molds against the work sur-face to remove any bubbles.
Add the half-sphere of smooth caramel into the middle of the crémeux and use a pastry spatula to smooth the crémeux completely. Freeze.
Using a food processor fitted with a whisk, beat the whipped ganache until a ribbon forms. Fill the Minidot molds three-quarters full.
Knock the molds against the work sur-face to remove any bubbles. Run a toothpick or the tip of a knife along the groove in the small cavity so that the whipped ganache sits snugly against the mold.
Arrange the frozen crémeux and caramel insert in the middle of the whipped ganache. Smooth using a pastry spatula. Freeze.
-
ASSEMBLING THE TARTLET
Arrange a thin layer of caramel in the base of the tartlet. Put in place a vanilla pastry disk. Whisk the rest of the crémeux to make it a little less stiff and use it to fill the tartlet to the top.
Smooth using a pastry spatula. Heat the mirror finish glaze to 95°F (35°C). Blend it, taking care not to create any bubbles. Turn out the vanilla whipped ganache domes and pick them up with a toothpick.
Make sure they are not icy, as this would prevent the glaze from adhering to the dome. Dip them gently into the glaze, being careful not to get any icing in the central hole.
Wipe away any excess glaze and arrange the domes on the tartlets.
(Another way of glazing the domes is to place them on a wire rack and protect the central hole using a cutter covered in plastic wrap.
Pour the glaze around the cutter before taking it away.)
Add some almond slivers around the edge of the tartlet. Put the vanilla nectar in the hole. Add 3 white chocolate pieces to decorate each tartlet.
Leave them to defrost for 3 hours in the refrigerator. Take the tartlets out of the fridge 15 minutes before serving.
-
STORAGE CONDITIONS
STORAGE CONDITIONS SMOOTH CARAMEL
Can be stored for 10 days in the refrigerator covered with plastic wrap. Can be stored for several months in the freezer covered with plastic wrap.
VANILLA FLAVORED SWEET PASTRY
Can be stored uncooked, rolled into a ball, rolled out or in tart cases, in the freezer for several weeks. Can be stored baked in the freezer for several weeks. Can be stored baked at room temperature for one week.
VANILLA SPONGE
Can be stored for 4 days baked, covered with plastic wrap, in the refrigerator. Can be stored for several months, baked and covered with plastic wrap, in the freezer.
VANILLA CRÉMEUX
Can be stored for 48 hours in the refrigerator. Can be stored for several weeks in the freezer.
VANILLA WHIPPED GANACHE
Can be stored for 48 hours in the refrig-erator and covered in plastic wrap before being beaten.
VANILLA NECTAR
Can be stored for 10 days in the refrigerator covered with plastic wrap. Can be stored for several months in the freezer.
VANILLA MIRROR GLAZE
Can be stored for 10 days in the refrigerator covered with plastic wrap. Can be stored for several months in the freezer.
FINISHED TARTLET
Can be stored for 48 hours in the refrigerator. Best if consumed within 12 hours of assembly.
Download the recipe
If you wish to make this recipe to enhance your Norohy vanilla, you can download it !
Download in PDF

About the chef The French Pâtissier
The man behind The French Pâtissier is Mehdi, a Lyon native who has made his passion for pastry-making and sharing experiences with others his vocation. He is a scientist by training, and it was while doing his doctorate in astrophysics that Mehdi started making pastries and discovered his passion. Finally, he decided to swap his astrophysicist’s hat for a pastry chef’s by training in top establishments alongside renowned chefs such as Cédric Grolet, Cyril Lignac and Maxime Frédéric. Endowed with an unstoppable creativity and and driven by a determination to pass on his knowledge and start a conversation with other passionate people, Mehdi decided to create his blog, thefrenchpatissier.com, where he shares his tips and innovative creations. Since then, his career plans have grown to encompass an ambition to bring pastry to life by sharing with people and awakening their senses.